Physics
High Schoolers Beware: Times are Gonna Get TOUGH
BY: Ellen Mornague
I won’t lie to you, physics was absolutely the worst unit of science for me. I worked way too hard to make sure my final grade didn’t slip here. You might be wondering why you need to succeed in physics. Grade ten physics, no matter how difficult it was to wrap my head around, was interesting. Grade ten was all about one word: optics. You’ll learn how light rays bounce off things, and how you can see. More importantly, you learn about how contacts work and different types of eye problems, which you might need to know in the future.
Here’s an overview of geometrical optics, and what you should expect to learn:
- What Is Light?
Light travels amazingly fast (at 300,000 kilometres per second) and in straight lines. It can travel through empty space (endearingly known as the vacuum) and does not need something to travel through. Light is a form of electromagnetic radiation, a wave that is both electric and magnetic.
- Types of Light
There are eight different types of visible light:
- Incandescent: Light from a heated object (like the now-rejected incandescent lightbulbs, a burning candle, or a stove top)
- Electric Discharge: The glow of gas caused by electric currents (like neon lights and lightning)
- Phosphorescence: The absorption of ultraviolet light, and the slow release of it as visible light (like glow-in-the-dark toys)
- Fluorescence: The absorption of ultraviolet light, and the immediate release of it as visible light (like a fluorescent lightbulb)
- Chemiluminescence: The light produced by a chemical reaction, also known as cold light due to the little heat it releases (like glowsticks)
- Bioluminescence: Light produced by a chemical reaction in living organisms (like fireflies and some fish)
- Triboluminescence: Light produced when crystals are rubbed or crushed together (like some candies)
- Light-Emitting-Diode (Also known as LED): Light produced by semiconductors so it can flow in one direction (like some Christmas and festive lights).
- Plane Mirrors
Plane mirrors are the mirrors you use daily, like your bathroom or bedroom mirror. When you look in the mirror, you see an image of your pretty self. But how do you see it?
Light rays from your light source (for example, your bedroom overhang light) go towards the mirror and hit it. It then reflects off the mirror to hit your eyes, enabling you to see. But your image isn’t behind the mirror. It’s actually right in front of it: you! The image you see in the mirror is not an image made of real light rays, but a projection from your brain to help you see the image. Images made with extended (but not real) light rays are considered to be virtual.
- Concave & Convex Mirrors
You would see these types of mirrors everywhere: in the car, at the store, and in some parking lots. These mirrors are curved because a part of their surface is reflective. There are two types of curved mirrors: concave and convex mirrors.
Concave Mirrors
A concave mirror’s reflective side is on the inside. They are also known as converging mirrors because the light rays all meet at one point. There are some words to know about these mirrors:
Center of Curvature (C or 2F): If you extended the ends of the mirror, it would make a full sphere. The middle of this hypothetical sphere is called the center of curvature.
Principal Axis: a line from the center of curvature to the center of the mirror.
Vertex (V): The point where the principal axis meets the mirror.
Focal Length (l): the distance between F and V
Focus (F): the point where the light rays coming in will be reflected through
Light rays come in parallel to the principal axis and hit the mirror. It then reflects and passes through the focus.
See Figure 1
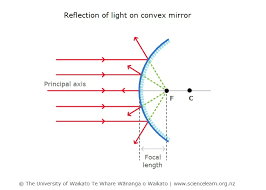
Convex Mirrors
Convex mirrors are mirrors that reflect outward. Therefore, the light rays that come in will diverge outwards. Convex mirrors have a principal axis, a center of curvature and vertex, but the focus for this mirror is behind the mirror rather than in front. This is why the focus for a convex mirror is referred to as a virtual focus.
When light rays come towards the mirror, they are parallel to the principal axis. They bounce off the mirror, but none of the rays meet in front of the mirror. This is because the mirror diverges the rays or splits them in different directions. In order to make an image, you need to extend the rays behind the mirror. Once you do that, there will a point where all the rays meet, which is where your image will be.
See Figure 2
- Mirror and Magnification Equations
Yes, there is math in physics. And yes, it can tie your head in five thousand knots. All it takes is practice.
First, there are mirror equations.
The mirror equation is: 1 = 1 + 1
_ _ _
f di do
What do the values mean?
F: Focal length
Do: Distance of the object from the vertex
Di: Distance of the image from the vertex
If you are given two of these variables, you can solve for the other without having to do any drawings or measurements.
Now comes the magnification equations.
There are two ways to find the magnification:
m = hi – di
—- OR —–
ho do
The meaning of the new values:
hi: the height of the image
ho: the height of the object
These formulas can also be combined to make:
hi – di
—– = ——–
ho do
Magnification tells you how much larger or smaller the image is when compared to the object. If the magnification is smaller than 1, the image is smaller than the object. If the magnification is larger than 1, the image is larger than the object. An important thing to remember is you must make sure your units are the same! If you are using centimetres (cm), make sure all the units are centimetres, and convert the numbers if you need to. Magnification cancels out the units, so units don’t need to be watched for here.
- Refraction & Total Internal Reflection
Refraction is the bending of light when it passes from one medium (one substance or material) to another. Refraction also causes the speed and direction of the light to change because the medium changes.
Remember, the more optically dense a medium is, the slower light travels through the medium.
The angle of refraction is the angle between the normal (which is the light blue dotted line) and the refracted ray (represented in green). This is important to remember from here on in. If the refracted ray is closer to the normal, light is travelling slower. If the refracted ray is farther away from the normal, light is travelling faster.
The index of refraction is a measure of the speed difference of light when it passes through a new medium. The number is different for different mediums. Sadly, this is accompanied by another formula:
n of the medium = c
—–
v
N: the index of refraction in the medium (which doesn’t require units)
C: the speed of light in the vacuum (which will always be 3.0 x 10⁸ metres per second)
V: speed of light in the medium
IMPORTANT: When using this formula, the c value will always remain the same: 3.0 x 10⁸ m/s
Total internal reflection is an optical phenomenon in which the light ray that comes in is trapped in the medium it came from. It reflects due to the angle of incidence being greater than the critical angle.
The critical angle is the angle of incidence when the angle of refraction is 90o. When the angle of refraction equals 90o, no refracted rays pass through to the other medium.
Total internal reflection only happens when light travels from a more optically dense medium to a less optically dense medium.
- Lenses
Lenses are transparent objects with curved sides that makes light refract. There are two lenses you’ll deal with in grade ten: a convex or converging lens, and a concave or diverging lens. The centre of the lens is called an optical centre (O), not a centre of curvature (C). Lenses still have a principal axis, but lenses have two focuses: the principal focus and the secondary focus.
For a convex lens, light rays come in and hit the centre of the lens. They then get refracted and pass through the principal focus. For a concave lens, light rays come into the lens. But instead of passing through one point, they all separate and never meet. In order to create an image, the rays have to be extended backward, although they are not real.
To calculate things like the height of the image and the distance of the object, the formulas are the same as with curved mirrors (thank goodness for that!). The meanings for the symbols are also the same.
- The Human Eye and Its Problems
There are ten parts to the eye, and all work together to help us see:
Iris: the part of the eye which is colored, it controls how much light goes into the eye.
Cornea: The part of the eye that refracts and focuses the light coming into the eye.
Pupil: the hole in the middle of the eye that light enters through.
Lens: Behind the iris, it causes the light to converge
Retina: A layer of nerves that detects light coming in and converts this to a signal
Conjunctiva: lubricates the eye in the form of mucus and tears
Fovea: sharpens the vision
Optic Nerve: connects the brain to the eye and transmits signals from the retina to the brain
Suspensory Ligament: supports the eye and keeps it in place
Ciliary Muscle: controls the focal length of the eye, which helps you to see near and far.
However, there are four problems that can occur with your eyes.
- Hyperopia (Far Sightedness)
- It can be caused by the distance between the lens and retina is too short (which makes your eye short)
- It can also be due to the insufficient refraction of light
- The solution to hyperopia is a converging lens or a positive meniscus lens
- Myopia (Near Sightedness)
- It can be caused by the distance between the lens and retina is too long (which makes your eye large)
- It can also be due to too much refraction of light
- It can be corrected by a diverging lens, or a negative meniscus lens
- Astigmatism
- It is caused by the irregular shape of the lens or cornea
- This causes the eye to have many focal points.
- It can be corrected with lenses or laser eye surgery
- Presbyopia
- This is like far sightedness
- This is the reduced ability to focus on near objects
- Comes with age
- This can be corrected with converging lenses
All the information must have your head swirling, doesn’t it? Remember, this is just an overview. But, as you can see, it’s more than just math and science. It’s everyday life!
References:
Notes in Class – Mrs. Rego

Lights, Optics, ACTION! How Cameras Work (Optically)
BY: A. Faith Abraham
We have all used cameras at least one time in our lives. And I’m not talking about the iPhone XS camera. I’m talking a real-life, professional Canon camera.
Cameras have the ability to snapshot a moment in time and make it last practically forever. Its products capture the good times and memories and help us remember the special times in our lives.
But if you have been through physics or just finished physics, you might be wondering: how does a camera interact with light rays?
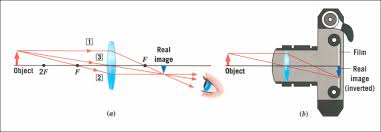
On the left side of the picture below, there are three light rays that pass through the lens:
Light Ray 1: From the top of the object, a light ray parallel to the optical axis refracts. Then, it goes through the focal point on the other side of the lens and straight to your eye.
Light Ray 2: This light ray passes through the focal point on the left side (also referred to as F prime [written as F1]). Once it refracts, it passes to the other side, and this refracted ray is parallel to the optical axis. This ray also goes to your eye.
Light Ray 3: This light ray passes straight through the optical centre (the middle point of the entire lens) and to your eye
See Article Figure 1
As the rays pass travel their respective ways, they meet in one condensed point on the other side of the lens. That point is the top of the original object! However, the image projected from the light rays will be upside down or inverted, even though the object did not flip.
So how do we see images upright if they project inverted? Our eyes send the image to our brain, and because we perceive everything upright our brain flips the image.
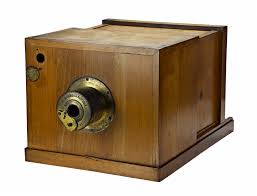
Cameras have been around for a long while now. A man named Johann Zahn created the first ever camera in 1685. But the first photograph was created in 1814 by Joseph Nicephore Niepce. The first few cameras were huge, and they could not save images. That changed in 1829, when Louis Daguerre invented practical photography, which was photography that can actually be saved or printed and was therefore useful. In 1839, the daguerreotype was born.
See Article Figure 2
Above is a picture of the camera built for practical photography developed by Louis Daguerre.
Here are some other important dates in camera history:
1841: Henry Fox Tablot invented the process of getting a number of positives from one negative. This process is called calotype
1851: Frederick Scoff Archer invented the idea of wet plate negatives.
1856: Hamilton Smith invented and got patents for tintypes.
1879: The invention of dry plate negatives.
1889: George Eastman invented the film roll.
1940: Color photography began.
All this led to the cool and new cameras like the Fujifilm X-T4 or the Canon PowerShot G5 X Mark II.
Now here comes the geek part.
If you are interested in cameras (like I’m starting to be in right now), what should you look for when it comes to cameras? What features should you keep an eye out for? What should you invest in?
It depends on the type of photographer you are or aspiring to be. The camera a portrait photographer uses will not be the same camera as a still life photographer.
Personally, I am an amateur photographer. I love taking photos of my family, and I am starting to get into nature photography, particularly flowers.
My expectations for a camera:
- Lightweight: I don’t want to carry around a heavy camera. Not only is it too hard to carry, but it might also hurt my hands and shoulders.
- Automatic Focus: This feature is one of my favourite features on a camera. The AF adjusts the focus of the image you are taking without having to manipulate the dial yourself. This is one of my must-have features in a camera.
- Medium-Sized to Small-Sized: Let me clarify that I don’t want a camera as tiny as the PowerShot G5 X Mark II. My preferred size for a camera is medium, with the lens on. Different lenses affect the size of the camera as a whole. But with the lens, mediums are my go-to.
- Medium Lens: Speaking of lenses, what sizes are my favourite? As an amateur, I don’t like the huge lenses, or the ones that open up at the end. I like the smaller lenses because they are lighter and, for my purpose, efficient enough.
However, aspiring photographers should use what is best for their photography styles and purposes. Event photographers may need the bigger lenses, or a bigger camera. Architectural photographers might need distinctive features on a camera compared to an expressive photographer. It all depends on you.
The price range for a camera also varies, depending on which camera you buy and where you buy it from.
You can buy cameras from different places. Some good brands include Fujifilm, Sony, Canon, Nikon, Samsung (yes, they do sell cameras!), Panasonic, Casio, and Leica. You can also find some in Best Buy, Henry’s, and Amazon. For some of the newer cameras, prices are high (as you can imagine). For the Nikon Z6 it costs about $2,000, whereas the Fujifilm X – T4 is $2,299. Prices go as high as $6,524.41 in Canadian dollars. As you can see, cameras are an investment to save up for.
Do I have a favourite camera? No, not yet. Do I use cameras frequently? Regretfully, nope. I’m not a professional yet, and I use whatever I can find. But cameras are worth buying and using. Cameras are like time machines: their results can take us back in time, and to the good old days.
References:
http://www.whoinvented.org/who-invented-camera/#:~:text=Johann%20Zahn%20designed%20the%20first%20camera%20in%201685.,in%20his%20book%2C%20Book%20of%20Optics%20in%201021. November 4th, 2020
https://www.pcmag.com/picks/the-best-digital-cameras November 4th, 2020
https://www.techradar.com/news/best-camera November 4th, 2020